
Flour-less Chocolate Chip Muffins

IMG_0388
Cookies were the go-to snack growing up in my family. There’s nothing like a warm cookie at night while watching a really good chick-flick! (Or growing up it was TGIF, you know you loved Friday nights!) So imagine my surprise/shock when I was at a friends house in college and his mom whipped up Chocolate Chip Muffins for the movie sweet treat! WHAT?!?!? Blueberries are suppose to go in muffins! But I will tell you, after that, those little things were quickly added to the list of late night snacks at my house!

So when I had these flour-less chocolate chip muffins in Sunday School, I knew I needed the recipe

I’ve only made the pre-packed chocolate chip muffins before- but these home made ones are delicious. And to make it even better-depending on what ingredients you use, can be gluten free!!

Here is what you need:
1 large egg
1/2 cup almond butter or peanut butter *
1 medium or large banana
3 tablespoons of honey
1 tablespoon vanilla extract*
1/4 teaspoon baking soda*
mini chocolate chips*

*NOTE: Please read the labels on these ingredients to make sure they are gluten free! Even products that are labeled gluten free may contain soy, which could lead to cross contamination. If you have a gluten allergy, Please err on the side of caution. These things are too good for you to get sick!

What to do:
1) Pre-heat oven to 400 and spray a mini muffin pan (If making GF, make sure your cooking spray is GF)
2) Mix first six ingredients in a blender until smooth.
3) Add as many or as little chocolate chips as you want and mix together (you can also add walnuts, coconut, whatever you would in normal muffins. I haven’t tried fruit in these- so I’m not sure how that would turn out)
4) Spoon mixture into muffin pan and fill 3/4 full
5) Bake for 8-9 minutes or until toothpick comes out clear.

Eat and Enjoy

(It you omit the chocolate chips this recipe is a lot healthier)
DIY Carpet Freshener

IMG_0357

Have you every thought about how much we use the carpet in our homes. We walk barefoot on them, sit on them, workout on them, the little ones crawl around, the list could go on and on. It’s no wonder that the carpets need to be freshened up from time to time! Unfortunately most carpet fresheners have overpowering scents and chemicals- and who really wants to lay, play, workout on that. {Not Me!} This past week I made a DIY Lemon and Thieve Carpet Cleaner.

DIY Carpet Freshener is a great way to save money and help rid your home of chemicals!

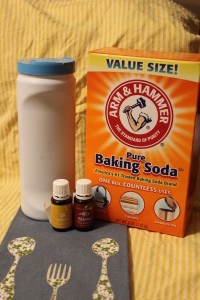
Things you will need
* Container of some sort (I used an empty carpet freshener bottle)
* Baking Soda
* Essential Oils (I used Young Living Thieves and Lemon. You can order these by clicking HERE)
* Mixing Spoon
* Mixing Bowl

Directions:
1) To get the right amount of baking soda, pour it into the container and fill to almost the top.
2) Next pour the baking soda from the container into the mixing bowl.
3) Add essential oils and mix- depending on how big your container is will determine how many drops. You can just guesstimate. I used 10 drops of Thieves and 10 drops of lemon.
4) Pour or spoon baking soda back into container and add the cap {Normally you ALWAYS wanted to use glass containers when using oils. Because this was so heavily diluted with baking soda, I didn’t worry about that. I’ll let you know if it eats away at the plastic.}

Now your carpet will smell fresh and you will be putting something natural on them!

{For more information on Young Living Essential oil click here}

{Disclaimer: Any suggestions made on this blog are very specific to Young Living essential oils and should not be used with oils from another source. Statements made on this website about Young Living Essential Oils have not been evaluated by the FDA. These products and information are not intended to diagnose, treat, cure or prevent any disease. Anyone suffering from disease or injury should consult with a physician. If you are currently on medication, please DO NOT STOP. For full disclaimer please click HERE}